Showing posts with label BLOGGER TRICKS. Show all posts

Two Best Ever Platforms For Guest Bloggers And Blog Owners

Guest Posting
Guest posting is the new trend for bloggers nowadays and the key motto of guest posting is genuine backlinks. 3-4 months ago, guest posting was unheard name for me but now I'm solemn towards it. Till now I've published 42 guest posts on my site from different authors, you can check all of them from here and the whole credit goes to Blogger Linkup and MyBlogGuest.

Both websites provide platforms for guest bloggers and blog owners, from where any blog owner can request for available guest posts or guest blogger can offer his guest post, but these both work on different concept.

1. Blogger Linkup is a free service from where bloggers can submit request for:
  • Offering guest posts.
  • Requesting guest posts.
Join Blogger Linkup list for receiving alerts on every monday, wednesday and friday. List contains needed guest posts, available guest posts, products for review/giveaway, contests and sources for interviews. Check out its official site from here.

2. MyBlogGuest provides community for all guest bloggers. it works on the concept:
  • The blog owner writes an article and shows it to the blogger.
  • The blogger decides if the article fits his blog and if yes, publishes it on the site.
Sign Up now and be a part of professional blogger community. Check out its official site from here.

Note: Apart from these, make a section on your blog/site about guest posting (like check out my site's section from here). Guest posting helps in growing network and driving more traffic to your site. So start building your network and site backlinks now.
How To Create Secondary Site Map For Blogger (Table Of Contents)?

How To Create Secondary Site Map For Blogger (Table Of Contents)?

Hello bloggers! Before continue, thanks to Abu Farhan for sharing wonderful wonderful javascript. All you must have heard about site map and what it does. Let me clear in brief what is site map? Site Map represents  the hierarchical structure of your blog posts (like table of contents) and make it accessible to crawlers to index your blog/site properly. It allows the users to navigate through the blog/site to find the information they are looking for and for more information click here.

Note: Well in blogger, you don't need to create any site map as Google generates it by own for your blog. You can find out your primary blog's site map here: BLOGURL/feeds/posts/default?orderby=updated. Secondary site map is only for your users not for crawlers.

In this post, I am going to tell about creating a secondary site map for your blog like table of contents from where users can easily navigate through your blog.

For e.g check out my site's secondary site map: http://www.basicsofhacking.com/p/site-map-of-basicsofhackingcom.html

Follow these simple steps:
  • Add the following HTML code in your blog where you want to display it:

    <script style="text/javascript" src="http://www.abu-farhan.com/script/daftarisiblogger/blogtoc-min.js"></script>
    <script src="http://www.basicsofhacking.com/feeds/posts/default?max-results=9999&amp;alt=json-in-script&amp;callback=loadtoc"></script>


    Replace "http://www.basicsofhacking.com" with your blog URL.
  • That's all.
Note: I recommend add it on menu bar of your blog, for adding it on menu bar: create a static page, paste the above script in content area, publish it, then link created page to menu bar.
How To Remove Default Footer In Blogger And Adding Your Own Customize Footer?

How To Remove Default Footer In Blogger And Adding Your Own Customize Footer?

It's so easy to make a blog in blogger, but in reality it's very hard to make an effective and user friendly blog (especially in terms of terms of SEO). Today, I'm gonna tell you about "How to remove default footer in blogger and adding your own customize footer?".

Some bloggers don't like default footer in their blogs like me and they wish to add their own customize footer. Well, it's too easy to remove the default footer, follow these simple steps:
  • Login to Blogger.
  • Go to Design> Edit HTML
  • Backup your template.
  • Check “Expand Widget Templates". 
  • Look for the code: 

    <footer>
    <div class='footer-outer'>
    <div class='footer-cap-top cap-top'>
    <div class='cap-left'/>
    <div class='cap-right'/>
  • Change it with the following code:

    <footer style='display:none'>
    <div class='footer-outer'>
    <div class='footer-cap-top cap-top'>
    <div class='cap-left'/>
    <div class='cap-right'/>
  • Click Preview and Save Template. You've removed your default blogger now.

Adding your own customize footer:


After removing default footer, next step is to add your own customize footer (e.g.: you can scroll down and check my site's customize footer):
  • Again go to Design> Edit HTML
  • Look for: </body>
  • Add your customized footer before body close tag.
  • That's all.
Note: I recommend not to go with any customize blogger template (or purchase it). Pick any of default blogger template and make your own customization in it. It would enhance your knowledge and will make you a perfect blogger.

How To Make Grab This Button For Blogger?

Hi everyone!! Hope you all are doing well!! Well today I come up with a new idea which is useful for all blogger "Grab This Button or Link-back Button". Grab button would help readers to copy/paste the code in their blog/site and link-back to your blog/site. For better understanding, check "Grab Our Button" for my site at the bottom of right sidebar, follow these simple steps for making grab this button:
  • Make button: Use Photoshop or any online button maker site like Cool Text Buttons, Brilliant Button Maker.

    Note: Keep in mind to make your button visible and attractive.
  • Upload the button on any free image hosting.

    Note: As I recommend, never upload your blogger images on any free image hosting site because blogger provide it already. Confused? Well just create a new post, upload your all images here, save it as draft instead of publish. Now right click on uploaded image in post editor, copy image URL and paste it wherever you wanna to display.
  • After uploading, go to Design> Page Elements> Add a Gadget.
  • Choose HTML/JavaScript.
  • Choose suitable title like "Grab Our Button", "Grab This Button", "Link To Us" etc.
  • In content area, paste the following code:

    <img src="paste your button url"/>
    <textarea style="width: 100%; height: 100px" name="textfield"><a title=" enter your blog title" href="enter your blog url" target="_blank"><img border="0" src="paste your button url"/></a></textarea>
  • Replace the bold text with your own.
  • That's all.
If you want link-back to my site, then copy the below code and paste it on your blog/site.

Learn The Basics Of Ethical Hacking

How To Complaint Blogger & WordPress About Copyrighted Content Of Sites?

Hello everyone!! In this post, I'm gonna explain about reporting Blogger and WordPress about copyright content of your site (without any charge) just by filling a DMCA form. What is DMCA? DMCA (Digital Millennium Copyright Act) is a copyright law that control access to copyrighted works. So if you find any suspicious link from some other other website who is copying your posts, you can file a report to that website's hosting provider. Well if the infringing site's hosting provider is Blogger (Google's service) or WordPress, you can file a report without any charge, I don't know about other hosting providers, but mostly don't provide this service for free. You can get a better idea about it from DMCA's official website. The reason I'm telling here about blogger (Google's service) and WordPress is that these two provide the best blogging sites.

Coming back to post, let's follow the procedure to complaint Blogger and WordPress about copyrighted content:

For infringing Blogger URLs:
  • Login to your Google (Gmail) account.
  • Go to the link by clicking here.  
Note: Before continuing, ask the owner of infringing URLs to remove the copyrighted content.
  • Under "What Google product does your request relate to?", choose Blogger/Blogspot.
  • In next column, specify the nature of your request.
  • Choose "I have found content that may violate my copyright".
  • In next column, choose whether you're copyright owner or authorized to act on owner's behalf.
  • Read the Important notice and after reading, check Yes under "I have read the above and wish to proceed".
  • Choose your infringing work, choose Text.
  • Again read the following instructions before continue.
  • After reading instructions, click on "this form" written in last line of instructions.
  • Under "Complainant's information", provide your correct information. 
Note: I recommend to enter your site's email address under "Contact email address" if you've otherwise proceed with your Gmail account.
  • Under "Your Copyrighted Work":
    • Under "Where can we see an authorized example of the work?", mention your copyright URL (one per line) like http://yourblog.blogspot.com/2012/02/post.html (in case of Blogger) 
    Note: It's not mandatory for copyright URLs to be hosted by Blogger.
    • Describe about your copyrighted work under "Identify and describe the copyrighted work".
  • Under "Allegedly Infringing Material", 
    • Under "Location of the allegedly infringing material", write URL of the posts where the infringing content is located.
  • Under "Sworn Statements", check both fields.
  • Put your signature and read the "Account Disabling" section.
  • Click Submit and you've done.
  • You will receive a confirmation email and Blogger team will reply to you within 2-3 business days.
  • During this time, Blogger team will ask owner of infringing URLs owner remove infringement contents otherwise Google may remove the whole blog from search and even can suspend the site as they mentioned in "Account Disabling" section.
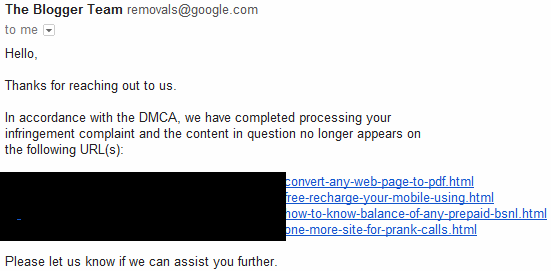
  • Screenshots showing consequences of whole work I described above:


Blogger Copyright Complaint
Confirmation mail

Blogger Copyright Work
Mail received after 2 days about removing infringing URLs.

Note: Following same procedure, you can report to Google about other copyrighted Google products too.

For infringing WordPress URLs:
  • Go to the link by clicking here.
  • The whole procedure and complaint form is given here.
Note: Only reason behind this post is to make aware public about DMCA. Newbie register their free blog using blogger/wordpress and start copying posts from other sites (because they want more traffic) and even they don't remove content after responding from copyrighted owner. Some of my friends had lost their sites in it's unawareness even their sites were getting good traffic.

So write your own words, and even if you find any relevant information from other sites, then try to publish it in your own wording. It would definitely enhance your knowledge. Hope you understand and have a nice weekend!!

    How To Make Dropdown Menu For Labels Widget In Blogger?

    Dropdown Menu for Labels Widget
    Hello friends!! Today I'm gonna tell about creating drop down menu for labels widget in blogger. As archive widgets provide this feature by default, but for labels widget, you would've to manually implemented it.

    A labels widget displays your post labels. By default, it displays post labels as "Lists" or "Cloud" only. Displaying labels with lists or cloud menu is good enough for new blogs or blog with few posts and labels, but as your posts increase, so will your labels too. So it will occupy a lot of space in blog's side bar. Using this hack, labels widget size will be reduced to just one line & will only expand into a full list when you click it.

    Follow these simple steps:
    • Login to blogger.
    • Backup your template.
    • Go to Design> Edit HTML
    • Check “Expand Widget Templates".
    • Look for the code:
      <b:widget id='Label1' locked='false' title='Labels' type='Label'/>
    • Replace it with:
      <b:widget id='Label1' locked='false' title='Labels' type='Label'>
      <b:includable id='main'>
      <b:if cond='data:title'>
      <h2><data:title/></h2>
      </b:if>
      <div class='widget-content'>
      <select style='width:100%' onchange='location=this.options[this.selectedIndex].value;'>
      <option>Click to choose</option>
      <b:loop values='data:labels' var='label'>
      <option expr:value='data:label.url'><data:label.name/>
      (<data:label.count/>)
      </option>
      </b:loop>
      </select>
      <b:include name='quickedit'/>
      </div>
      </b:includable>
      </b:widget>
    • Preview it & then Save.
    • That's all, now you have reduced space for your labels widget.